Prefetch Files: Identifying Files Targeted by Data Extraction, Staging and Exfiltration
/ 6 min read
Table of Contents
Introduction
Prefetch files are typically used to provide evidence of execution during an investigation. In the absence of other artifacts, can they extend beyond evidence of execution to provide an indication of files targeted for extraction, staging and exfiltration?
Understanding Prefetch Files
As with most forensic artifacts, prefetch files were not originally introduced for their forensic value. They were originally created to speed up subsequent application launches, in turn, improving the end-user experience. As part of this, prefetch files store information about files and directories referenced by an application within roughly 10 seconds of startup.
Prefetch files are enabled by default on Microsoft Windows desktop operating systems. Additionally, they also record the last 8 run times of an application. Prefetch files are located in the %SystemRoot%\Prefetch directory and follow the format FILENAME-HASH.pf. The hash is calculated by factoring the file location and any parameters.
Why the Interest in Archiving and Exfiltration Tooling?
Archiving software such as 7-Zip, is used for legitimate purposes yet is frequently also used by Threat Actors to extract and stage data. When other artifacts are limited, prefetch files can reveal details about staged data and extracted data contents. Threat actors typically enter an environment with a prebuilt toolkit, often compressed and requiring extraction. When extraction of the toolkit is done using archiving software such as 7-Zip, it may be possible to identify the contents of the archive. Completing this will provide indicators of compromise to support the investigation.
Data exfiltration is another common operation by Threat Actors to support their objective of double extortion. Where the files are staged or exfiltrated, originate from a physical drive on a system and prefetch files are enabled, it may be possible to identify the targeted files or directories. Admittedly this scenario is quite rare, as often Threat Actors will stage and exfiltrate from network shares which contain sensitive company data.
The Investigation Scenario
Scenario
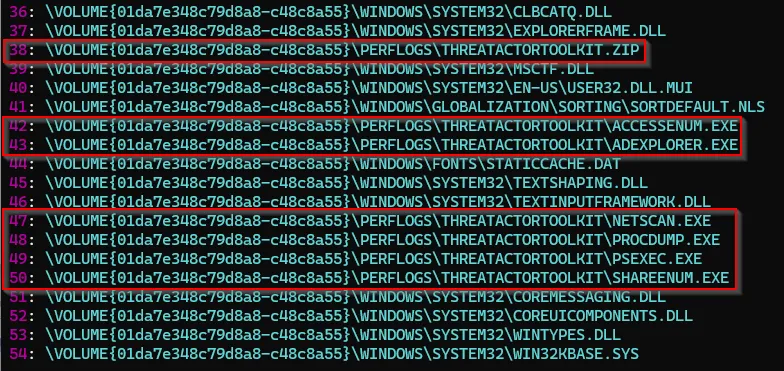
An organisation is facing a ransomware incident with confirmed data exfiltration from an end-user workstation through firewall logging. Legal has requested a focus on determining the data exfiltration scope prior to the data publication on a leak site. ShellBag artifacts revealed the Threat Actor accessed a now deleted directory C:\PERFLOGS\THREATACTORTOOLKIT which as the name suggests, likely contained the Threat Actor’s tooling.
Investigation Objectives
The objectives of our investigation and testing include:
- Identify the tooling used by the Threat Actor to decompress their toolkit.
- Identify the contents of the toolkit.
- Identify the tooling used by the Threat Actor to perform data exfiltration.
- Identify files and directories targeted for data exfiltration.
Considerations
As always there are always caveats and things to consider. Prefetch files are not enabled by default on Windows Server Operating Systems or Systems with Solid State Drives (SSDs). For the data exfiltration scenario, we have assumed that the sensitive data resides on the workstation. Prefetch files only capture roughly the first 10 seconds of process execution providing only an initial sample of targeted data. There is also potential for anti-forensic techniques and the possibility of Prefetch file deletion.
These considerations highlight the importance for investigators to correlate multiple artifacts and align with an investigative strategy.
Identifying the Contents of Extracted Archived Files
1. Tool of Choice: PECmd
For this scenario, we will use Eric Zimmerman’s prefetch Explorer Command Line (PECmd) which allows for easy analysis of prefetch files. PECmd can be downloaded directly from Eric Zimmerma’s website: https://ericzimmerman.github.io
2. Collecting Prefetch File
Before running PECmd, we will need to collect the prefetch files from the system. To make the collection process smooth you can use Kroll Artifact Parser and Extractor (KAPE). This will come in handy when you need to collect data from a system remotely using an Endpoint Detection and Response (EDR) or even Velociraptor. Once you have downloaded KAPE onto the remote machine, use the below command. Alternatively from a disk image, you can copy the prefetch files to a working folder on your forensic workstation.
.\kape.exe --tsource C: --tdest C:\Temp\Collection --target Prefetch --zip RDPCacheUpon review of the collected Prefetch files, we have identified a prefetch file associated with 7-Zip which of interest.
3. Running PECmd
Open a PowerShell and navigate to your tools directory that contains PECmd. Run PECmd on the prefetch file by using the following command syntax:
PECmd.exe -f [Prefetch filename] -–csv [output path]This command requests PECmd to parse the prefetch file output through the -f attribute. The --csv attribute directs the tool to output the results in CSV format to the chosen output path, which allows for easy review and revisiting as required.
4. Analyzing the Output
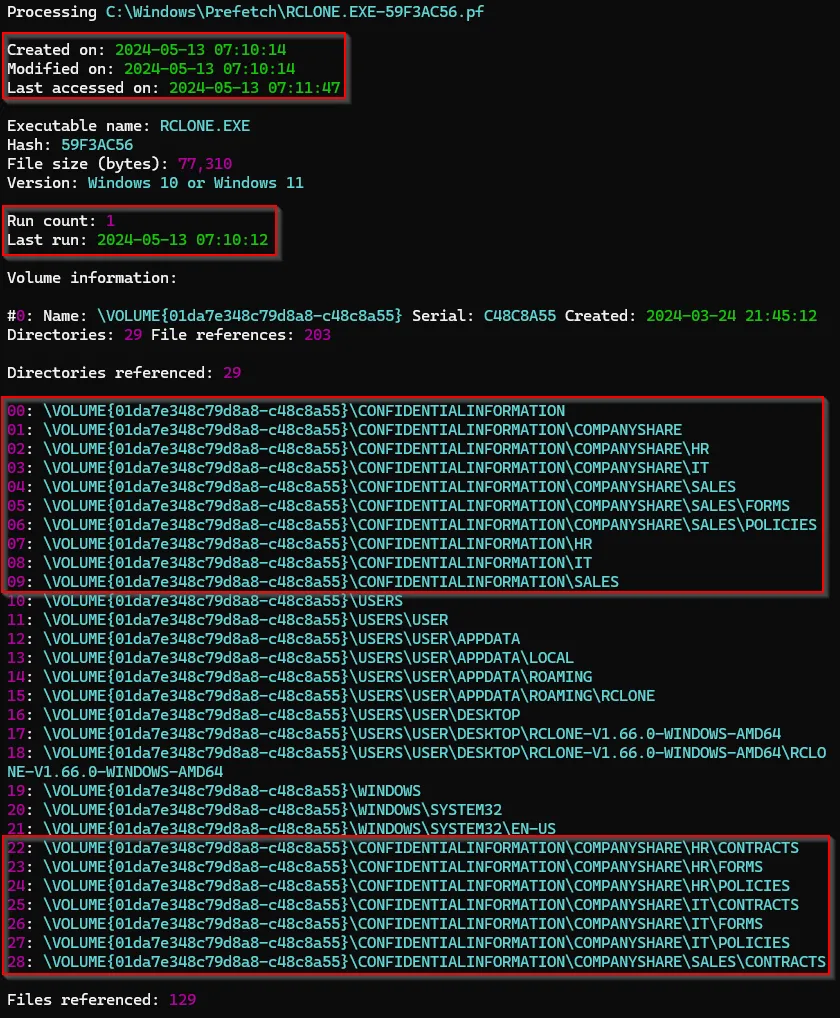
Below we have the terminal output of PECmd against the 7-Zip. We can see several details which have been parsed out of the prefetch file including as highlighted:
- Timestamps: Created, modified and accessed
- Binary Details: Executable name and file size
- Execution Details: Run count and run timestamps
- File System Interaction: Directories and files referenced
At this point, the significance of prefetch files is highlighted by achieving our objective of identifying the contents of an extracted archive. Within the PERFLOGS directory, we discover a folder named THREATACTORTOOLKIT. Furthermore, the “files referenced” section reveals the specific files extracted during this operation, including netscan, proddump, and PsExec, which are commonly found in threat actor toolkits.
A reminder that prefetch files will only capture approximately the first 10 seconds of an application running; meaning that there are no guarantees but rather an indication / point of pivot provided.

Data Exfiltration Scenario
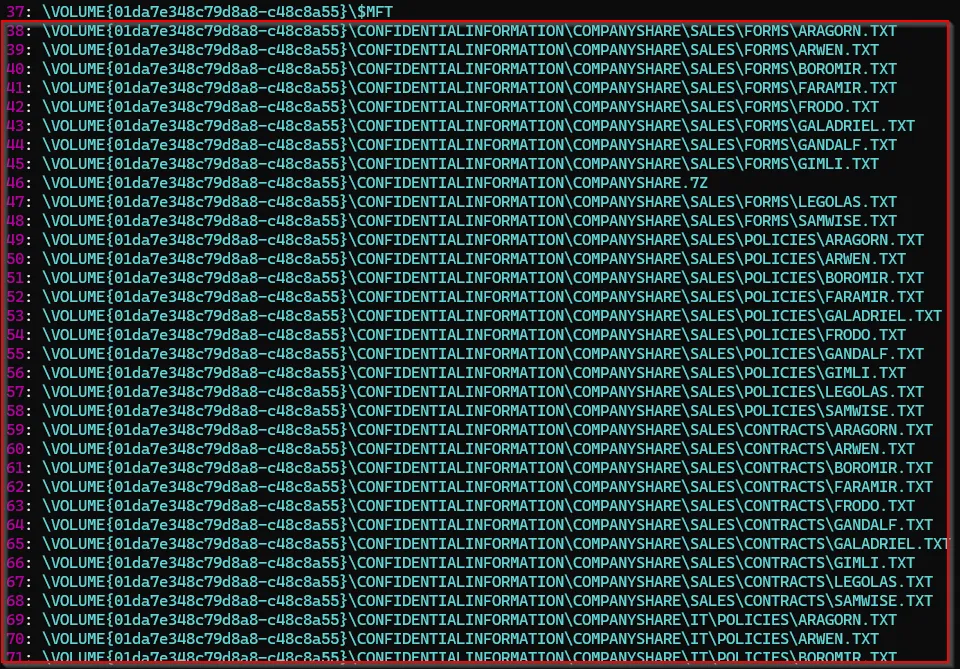
Within our collected prefetch files was a prefetch file for Rclone which is a common data exfiltration tool used by Threat Actors. There are several referenced directories of interest, notably the directories under the CONFIDENTIALINFORMATION directory. Additionally, in the “files referenced” section, we identified several files that were targeted in the program operation, all located within the directories of interest.
Side note: Recommend checking out the post Data Exfiltration in M365: Rclone Meets SharePoint (https://thedfirjournal.com/posts/m365-data-exfiltration-rclone/)
Final Thoughts
Ransomware investigations rarely involve prefetch files since Threat Actors typically operate from servers where they remain disabled. This said, where an attacker leverages a workstation, these opportunities may present through prefetch files.
This scenario demonstrates how an artifact typically used for evidence of execution can extend beyond that, allowing the identification of files targeted for data extraction, staging and exfiltration.
Additional Resources
- Forensic Value of Prefetch - SANS: https://isc.sans.edu/diary/Forensic+Value+of+Prefetch/29168/
- Hunting for Attacker’s Tactics and Techniques With Prefetch Files - Group-IB: https://www.group-ib.com/blog/hunting-for-ttps-with-prefetch-files/
- Prefetch: The Little Snitch That Tells on You - TrustedSec: https://trustedsec.com/blog/prefetch-the-little-snitch-that-tells-on-you
- Prefetch Deep Dive - 13Cubed: https://www.youtube.com/watch?v=f4RAtR_3zcs
- Prefetch file names and UNC paths: http://www.hexacorn.com/blog/2012/10/29/prefetch-file-names-and-unc-paths/